Dynamic DNS with Cloudflare, ddclient, and DNS-O-Matic (with Multiple Domains)
Posted on by AJ Ianozi
It’s been a very long time since I’ve updated this blog. For a while I’ve kept a separate one, AJfox.us, but the home server I’ve been using to host it failed about a year ago. I will be getting AJfox back up and running at some point, or I’ll port the posts to this site, I haven’t decided yet.
Anyway, this topic is about how to configure dynamic DNS with Cloudflare, using DNS-O-Matic and ddclient.
Reason for this post
There were plenty of guides on getting Dynamic DNS up and running with cloudflare, and one or two with DNS-O-Matic, but absolutely none for multiple domains. If you’ve found this guide by a google search, I’m assuming you already know at least what Dynamic DNS and Cloudflare are, if not you can check out the basics here: Replacing DynDNS with CloudFlare DDNS
I was trying to set up an easy way to set the DNS for multiple domains (e.g. ianozi.com and ajfox.us), which doesn’t seem to be covered anywhere online.
What is DNS-O-Matic?
To answer this question, let me quote someone who explains it better than I:
DNS-O-Matic is a service from OpenDNS for distributing dynamic DNS updates to supported authoritative DNS services. Cloudflare is one of the supported services. Source: Using DNS-O-Matic dynamic DNS updates with Cloudflare
And what is ddclient?
ddclient is a daemon that periodically updates your DNS information to a Dynamic DNS service. I’ve seen plenty of guides where people have been trying to get it working with Cloudflare, but it apparently requires patching the standard version to get it working correctly, I wasn’t able to.
Instead, I set up ddclient to sync with DNS-O-Matic, and then set DNS-O-Matic to sync with Cloudflare.
With that out of the way, let’s get down to business!
Step 1: Register accounts with Cloudflare and DNS-O-Matic
If you’re reading this, you probably already have a cloudflare account. If not, check out Cloudflare’s Getting Started page to see how to sign up. DNS-O-Matic is very easy, just head over to their website and sign up.
Step 2: Configure ddclient
That depends on what linux distribution you’re using. For me, with Gentoo, I just had to run:
emerge --ask ddclient
On Debian-based systems it would be:
apt-get install ddclient
Step 3: Configure Cloudflare
This is probably the weirdest part. The problem with DNS-O-Matic is that it will only support one A-record across all domains. As I’ve mentioned, every guide I’ve seen recommends that you create a hostname called “dynamic” (ergo dynamic.ajfox.us); however, DNS-O-Matic literally will not allow you to create the same hostname even for different domains (e.g. dynamic.ianozi.com).
Here’s what I did:
Generate a random string for every domain you have
Any supported random string generator will work; for simplicity’s sake I used the Random Letter Sequence Generator and set the length of each sequence to 16. One feature that I liked in this generator was the ability to generate several strings at once. For two of my domains, I generated two strings:
- sjnuuqvibcmvycpa
- bghpdqbwupqqdpmp
Create an A record with the random string that points to any IP address
For each domain, you’ll have to create an A record with that random string. This record can point to any IP address (I used 8.8.8.8).
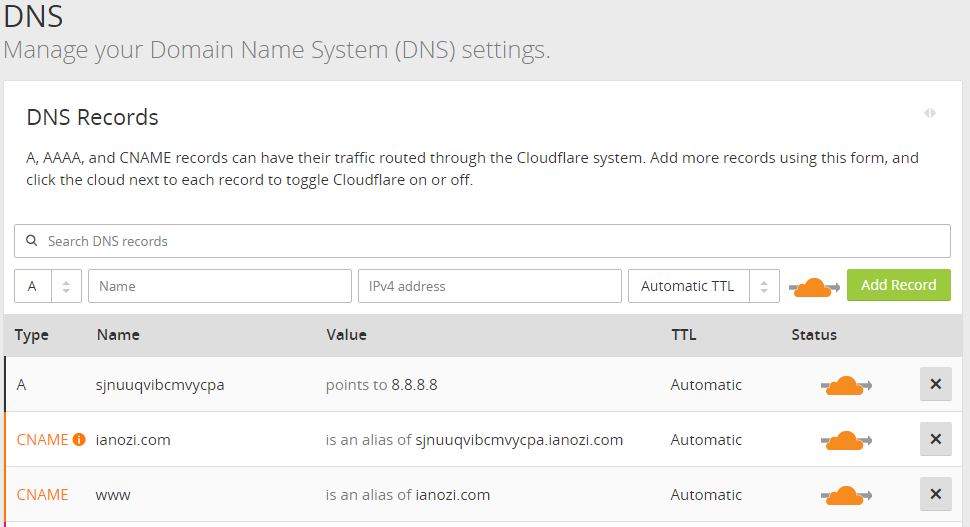
Here’s what it looks like in Cloudflare for ianozi.com:
| Type | Name | Value |
|---|---|---|
| A | sjnuuqvibcmvycpa | points to 8.8.8.8 |
Create two CNAMEs for root and www
You’ll want to create a CNAME for your root domain pointing to the A record and a WWW CNAME pointing to the root domain like so:
| Type | Name | Value |
|---|---|---|
| CNAME | ianozi.com | is an alias of sjnuuqvibcmvycpa.ianozi.com |
| CNAME | www | is an alias of ianozi.com |
Once you’re done, you should have something like this:
Afterwards, do the same thing for the other domain, using the other random string.
Step 4: Configure DNS-O-Matic:
This part is pretty straightforward.
Get Cloudflare API Key
First, you’ll need your Global Cloudflare API. Log into Cloudflare and click on your name in the top-right corner, then go to Settings. From there, scroll down to API Key and under Global API Key click on View API Key. This is your secret API key that DNS-O-Matic needs for logging into Cloudflare.
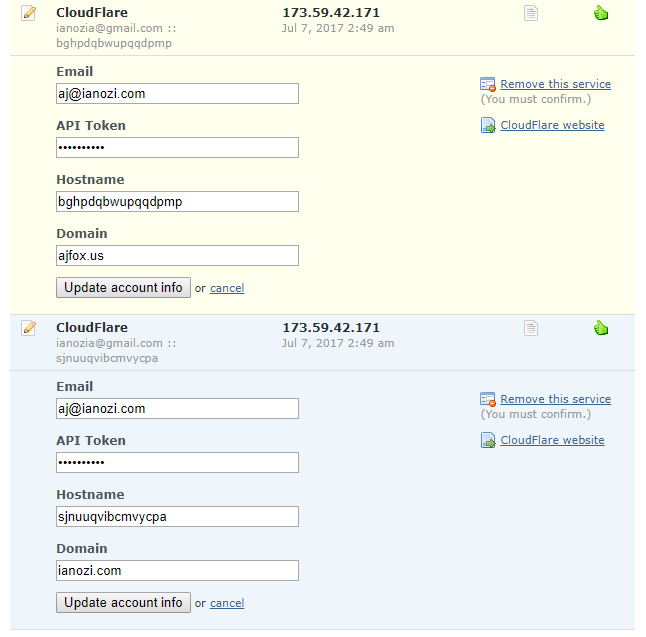
Add Cloudflare Service in DNS-O-Matic
You’ll do this for every domain that you own:
- Log into DNS-O-Matic and click on Your Services, then Add a service
- Select Cloudflare from the drop down menu
- Enter your cloudflare email address under Email
- Enter your API Token under API Token
- Enter your domain’s random string (from above) under Hostname
- Enter your domain under Domain
You can use the same API and cloudflare email, but you must use a different string for Hostname and Domain for each domain. Here’s what I have (note: not using my real cloudflare email):
Step 5: Configure ddclient
The configuration file is located at: /etc/ddclient/ddclient.conf
You’ll want to put something like this (be sure to change the USERNAME and PASSWORD to your DNS-O-Matic credentials):
use=web, web=myip.dnsomatic.com
server=updates.dnsomatic.com,    \
protocol=dyndns2,                \
login=USERNAME,                  \
password=PASSWORD                \
all.dnsomatic.com
That’s it! You can test to see if this configuration worked by manually running ddclient from the command line:
ddclient -daemon=0 -debug -verbose -noquiet
In my case it did:

Comments (& Webmentions coming soon)
Unknown on
THANK U VERY MUCH !
it needed for me .
Replies